How to Keep Track of Attendance on Webex
This page describes the steps needed to use Webex in Canvas. Instructors will need to complete these steps with every course site.
To use the Webex Integration, Rutgers NetID users will need an existing Rutgers Webex account. Please enable Webex via the Service Activation Portal.
Webex Setup
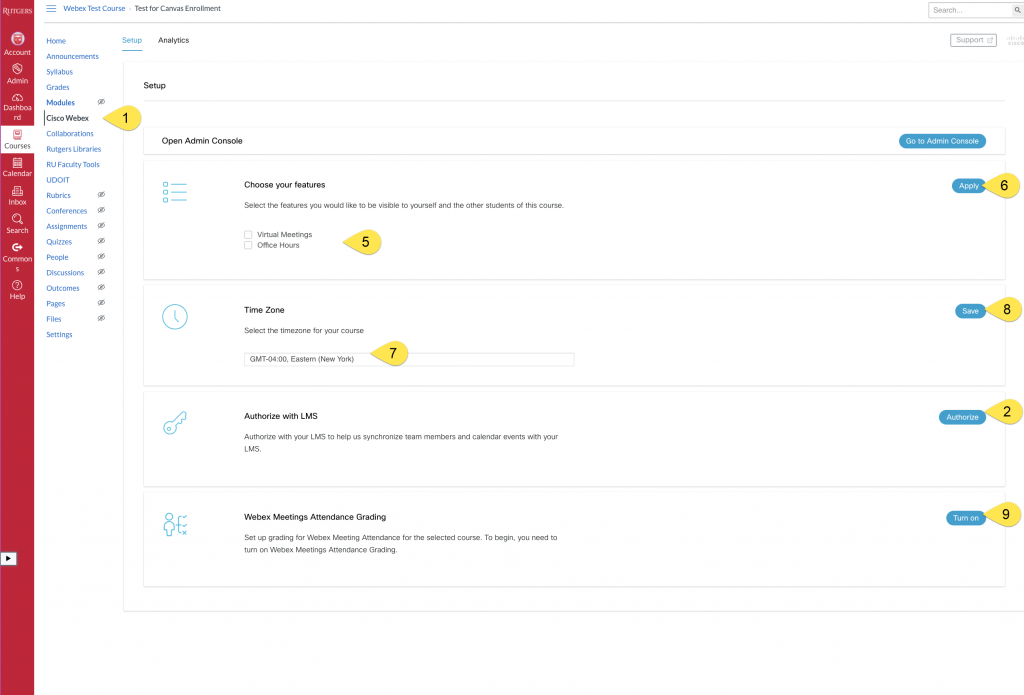
- Click on Webex in the course navigation. If it is not listed, enable it by managing the course navigation links in course Settings.
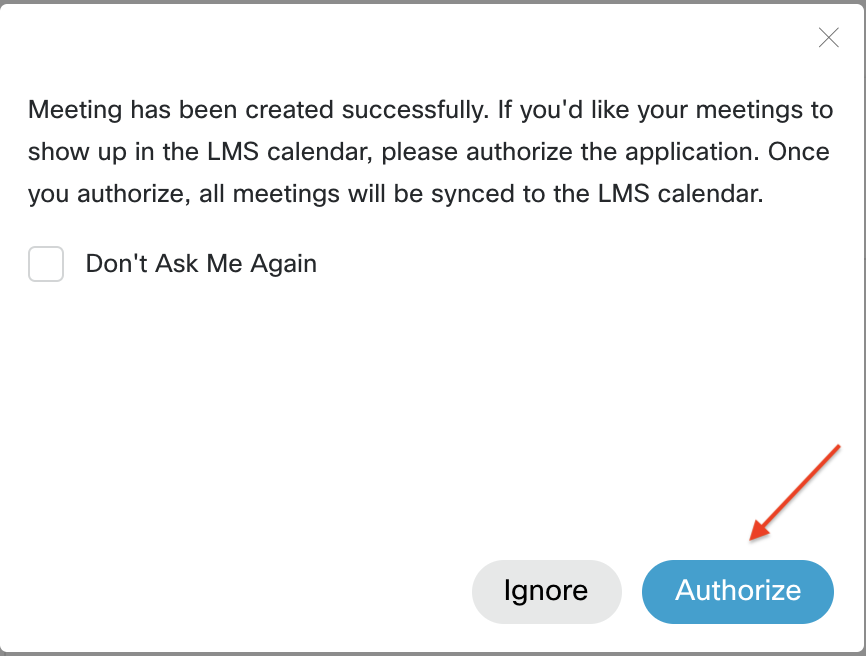
- Authorize with LMS: Click Authorize to pair your Canvas account to your Webex account. This will only need to be done once.
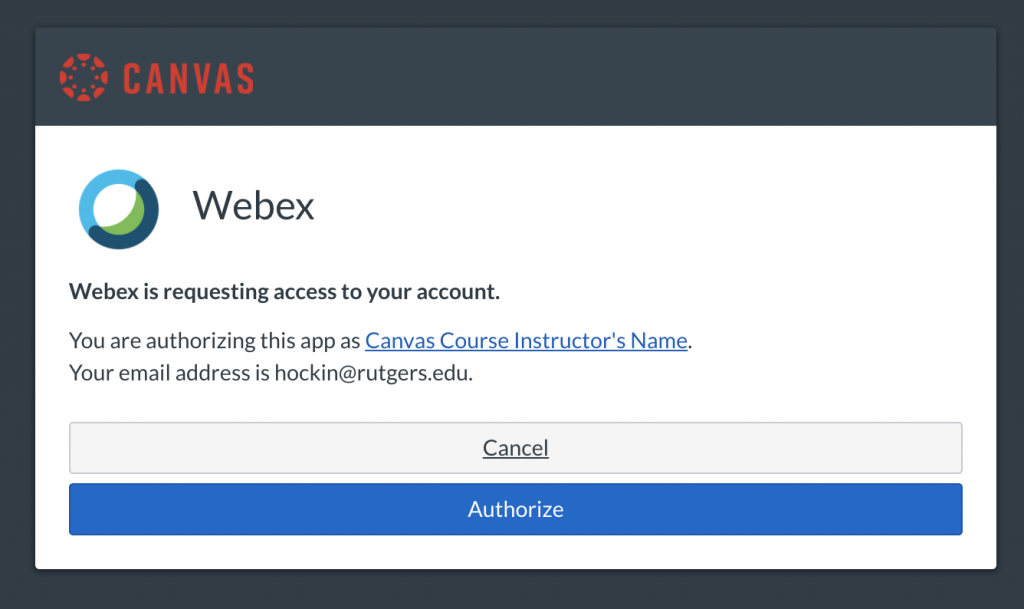
- In the pop-up window, click Authorize.
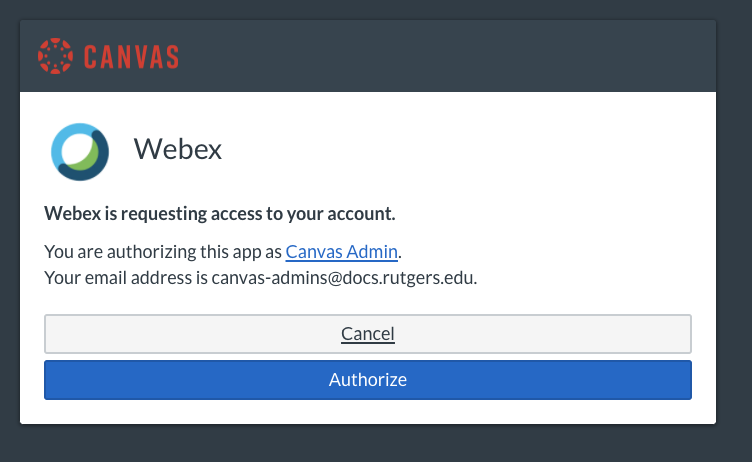
- If you are not already logged into your Webex account, you will be prompted to login with your NetID and password. When you return to your Canvas course, Authorize will be grayed out in this course and all your other courses.
- Choose your Features: Check the box next to the options you plan to use in your course. You will need to choose your features for every new course site.
- Click Apply.
- Set Timezone:Select your timezone in the drop down menu.
- Click Save.
- Webex Meetings Attendance Grading: Webex Meetings Attendance Grader allows instructors to assign a participation grade for attending virtual meetings in the course. CAUTION: Once this feature is turned on, it cannot be turned off. Your students must use the desktop client.
Virtual Meetings
Schedule a Meeting
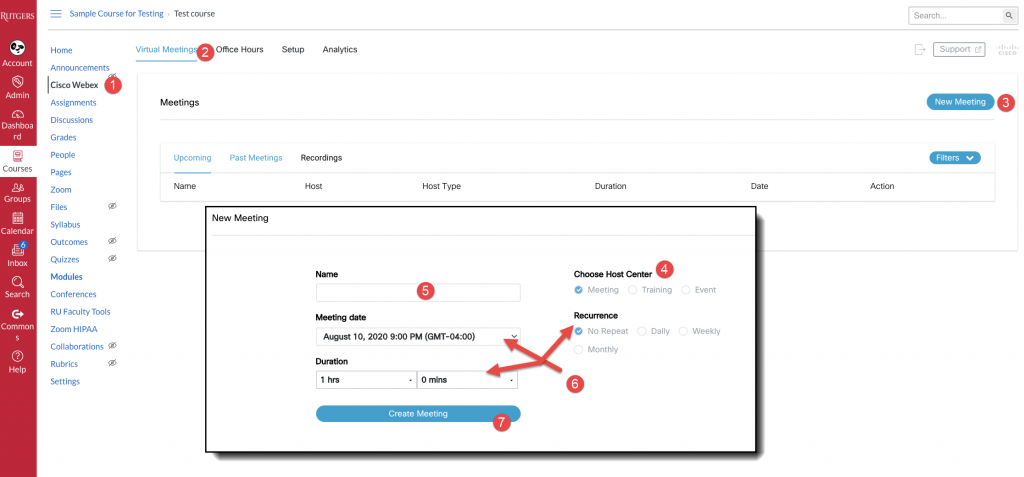
- Click Cisco Webex on the course navigation menu.
- Click the Virtual Meetings tab.
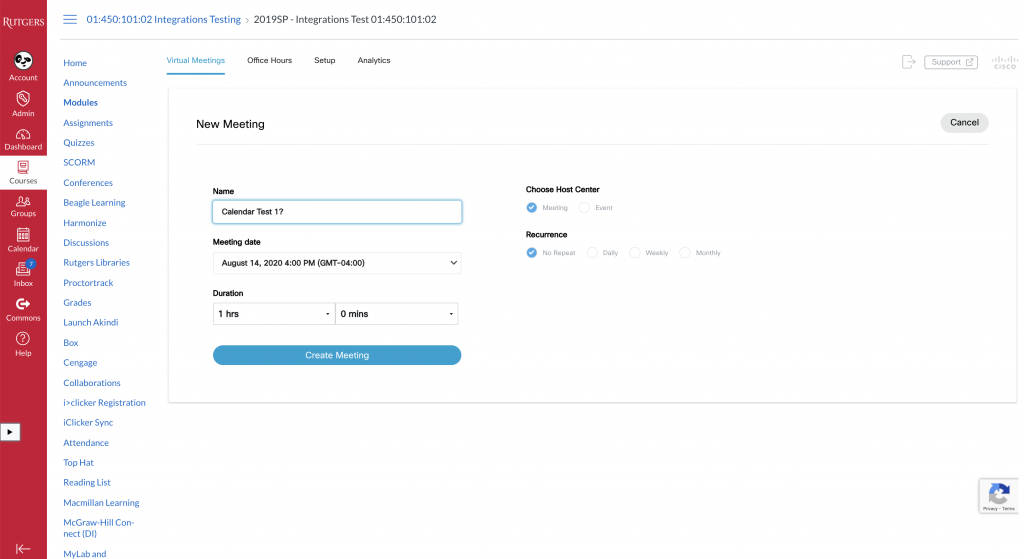
- Click the + New Meeting button.
- Choose Webex Host Center.
- Meetings are similar to your Webex Personal Meeting Room.
- Trainings are intended for instructional sessions and may include polling, quizzing, and breakout sessions.
- Events are designed for large presentations and include the option for many panelists.
- Enter a name for the meeting.
- Select the meeting date, duration, and recurrence. When setting the meeting date, be sure to choose the correct time zone from the "Time" drop-down menu.
- Click Create Meeting.
Schedule Recurring Meetings
- Under Recurrence, set your recurrence preference
- Daily – Meetings occur at the same time every day.
- Weekly – Choose the day(s) of the week and the meeting cadence.
- Monthly – choose the date of the month or the day preference.
- Set the Ending date by choosing a specific ending date ending after a specified number of meetings
- Click Create a Meeting.
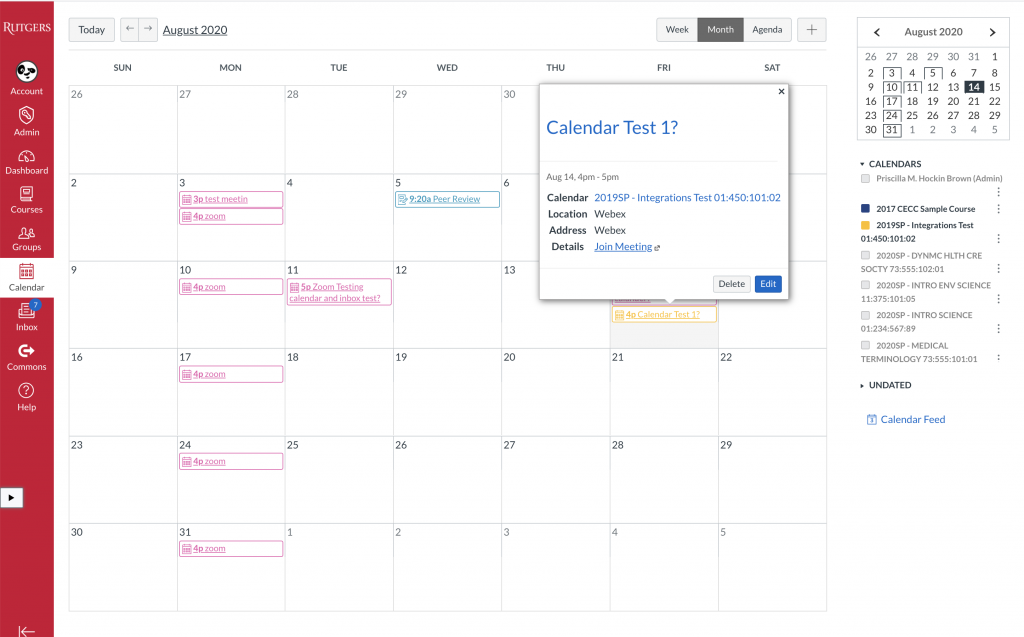
After a meeting is created, it will be listed in your Upcoming tab. You can view, join, start (host), edit, or delete a meeting from this tab.
When a Webex session is complete, it will be listed in Past Meetings and any recordings in the Recordings tab. Meeting participants will be listed when you click on the meeting name in Past Meetings.
Canvas Course Calendar
Scheduled Virtual Meetings will automatically appear on the Canvas course calendar and in the Canvas dashboard. Subsequent meeting changes will also be reflected in the Canvas course calendar and dashboard. Office hours availability or confirmed meetings will not appear on the course calendar or dashboard. If a student claims an available time slot for office hours, the student will receive an email with a unique join link.
Reauthorize Webex
Reauthorizing Webex only needs to be done once if you have previously used Cisco Webex in Canvas prior to the release of displaying meeting information on the course calendar.
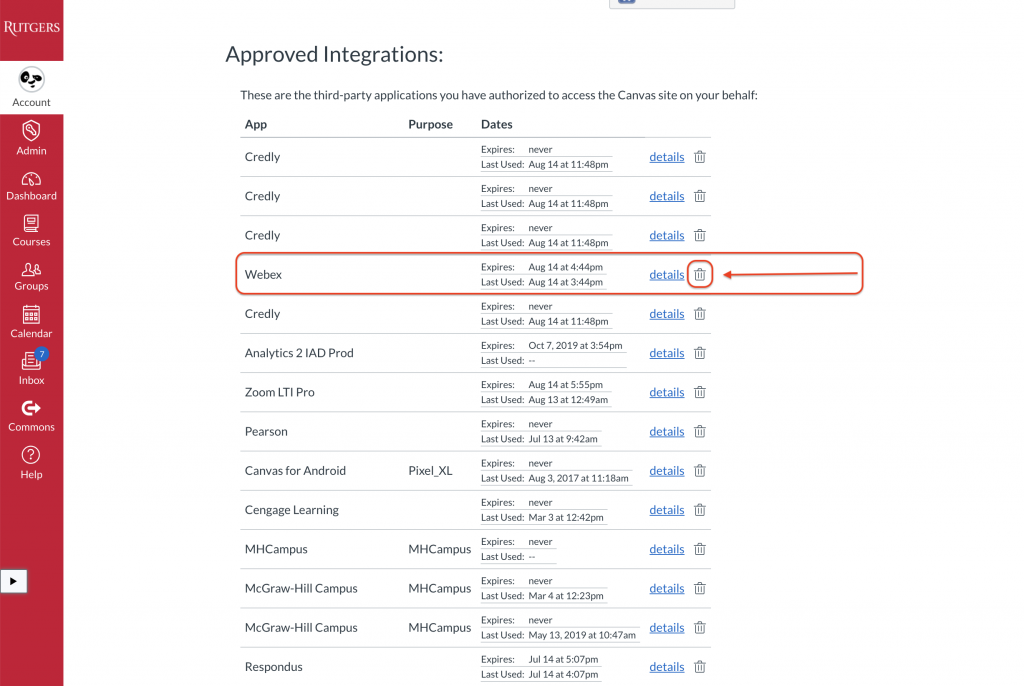
- If you have previously accessed Webex in Canvas, you will need to log out of Cisco Webex first to use this new feature.

- Navigate to your Canvas account settings.
- Scroll down to Approved Integrations and click the delete icon next to Webex.
Approve Feature Enhancement
- Go to your Canvas course site.
- Click Cisco Webex in the course navigation.
- As described above, schedule a Virtual Meetings.
- When prompted, click Authorize to Cisco Webex to list your course meetings on your course calendar.
- ClickAuthorize to grant permission for Webex to access your Canvas account.
- Your students will not see your Webex Virtual Meetings on your Canvas Calendar.
Office Hours
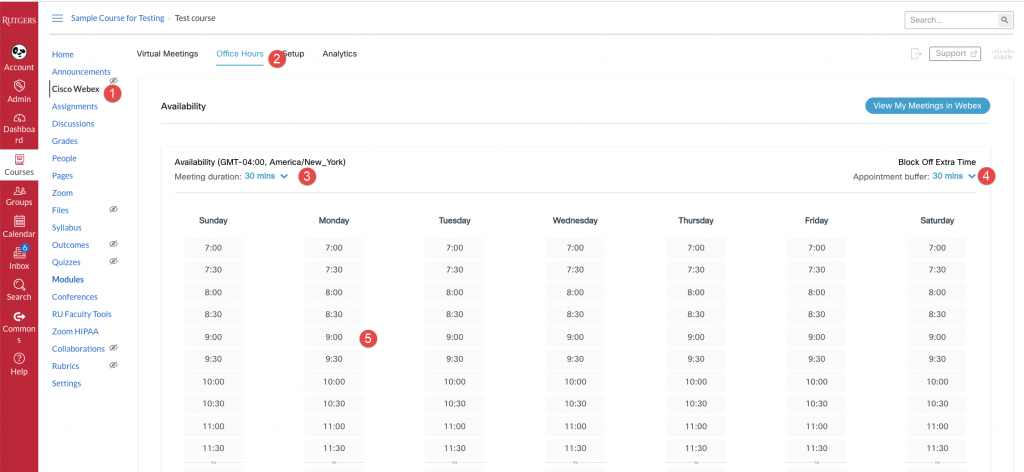
- Click Cisco Webex on the course navigation menu
- Click on Office Hours
- Click the drop-down arrow under Availability to choose the meeting duration in increments of 15 minutes.
- Click the drop-down arrow under Block Off Extra Time to choose the amount of buffer time before and after a scheduled meeting.
- In the grid display, click the time for the days of the week to select the times that you are available.
- Scroll down and click Save.
NOTE: Office hours are instructor-specific with the meeting links tied to an instructor's Webex account. Webex Office hours are not course specific so the office hours you set in one course populate all your courses in Canvas. Multiple instructors inside a Canvas course may claim the same time period.
Security and Link Sharing
Please caution your students against sharing Webex links. Webex links are unique to the participant (student) and the meeting. The Webex link will also include the meeting password. Since the link includes participant information, when a link is shared, then two participants with the same name will appear in the participant panel. This has implications if you are using the Webex Meetings Attendance Grading feature.
How to Keep Track of Attendance on Webex
Source: https://canvas.rutgers.edu/documentation/external-apps/webex-setup-for-instructors/
0 Response to "How to Keep Track of Attendance on Webex"
Postar um comentário